

Friday, November 6, 2009
Monday, October 26, 2009

The Aries 1-X test rocket sits on launch pad 39B at the Kennedy Space Center in Cape Canaveral, Florida October 25, 2009.
This is the Program Trevor has been working so hard on. Good Luck with the launch tonight!
Tuesday, October 20, 2009
Go BOO someone!
Our family has had so much fun BOOing our neighbors. I found THIS GREAT WEBSITE where you can print off the poem and sign for them to hang on their door after. We even got BOOed the next night from the people we BOOed. My kids love it! Now go BOO someone!
Tuesday, September 15, 2009
Super Saturday Enrichment Ideas
I have been crazy the past couple of weeks trying to come up with ideas for our Super Saturday. This is what I've come up with. I would love to hear your honest opinion and comments! For the Snowmen Kits, we are collecting Baby Formula Scoops for the pipes. If you have any you want to donate, let me know! Sorry, these items are only available to the lucky girls in my ward. (Or unlucky depending on if they like them or not) But if you want any info as to where to get some of the items, leave me a comment and I will try to get back to you. 
A lot of people have asked so here are the Printable Muffin #s. This is the Link where I got the idea.
I printed the #s on cardstock and used a big circle punch to punch them out. There's a video and then instructions on the link. Basically you cut out twenty four 2 1/4" squares out of cardstock and then use a corner rounder. They did circles and squares, I simplified to just squares. Then you glue the # circle on top and add a couple strips of adhesive magnet on the back. (Comes in the roll at Walmart). Then you can embellish as much or little as you want. We found the muffin tins at Walmart for 4.99.
Muffin Tin Numbers 
Here is the Personalized Menu Form. Print this off and add the personalization. Then put it inside a 8.5x11 plexi glass magnetic frame at Walmart. They are $3 in the frame section. Add a dry erase marker with some sticky velcro and some ribbon. It is helpful to put a glue dot on the frame bottom edge to hold the paper inside tight.
Personalized Menu Form 


Thursday, September 3, 2009

Mr. Mobile

Here is McKade's latest. He is now "mobile". I don't know what you could call his weird scooting while dragging a leg bent behind him move, but I do know he is everywhere now...
Fabulous Riley
This pic is so Riley. This is where I found her today after getting ready for school. She had her backpack on (3 hours early), sitting outside on her sidewalk chalked driveway masterpiece in a lawn chair, with her umbrella eating a sucker. What a great time for a photo shoot! I didn't have to do anything!
Wednesday, September 2, 2009

Tuesday, September 1, 2009


Riley's First Day

Riley's first day went great. She loved the bus, loved her class, loved the teacher etc. It was a lot harder for me than I thought it would be. I can't believe she is so big!


Friday, August 14, 2009
Personalized Money

Check out this fake money you can create at www.festisite.com/money. It's so easy!
These are now what my kids earn as their rewards for doing chores and being good. Then they can come to the Reward Store for their pick of a reward and pay the price. Like a half an hour of playing the XBOX is $1. Having a friend over is $2.
They get one dollar each time they earn 5 magnets. Luke has 5 truck magnets and Riley has 5 car magnets. The magnets live on the fridge and get to be put on a little magnetic board anytime they are good and get put back on the fridge for bad behavior. You get the point. I am definitely not the expert on well behaved kids, but I do know this money is super cute and I have been able to run errands with almost no problems with all 3 kids in tow now. You can work it however you want, but when your kids see their picture on a dollar bill that they get to spend, you can't go wrong.
Tuesday, August 11, 2009
Preschool Activity Bags

Just had to post these fast... I made them with a group a few months ago. We searched and searched for these pencil cases to put them in. Some people paid $2 a piece for them. Well right now in Walmart's Back to School section they are only 25 cents! A great deal! Go get 'em!
So Preschool Activity Bags or Kits are an ongoing idea where you put together a few easy educational kits together for your kids. They only get to have them at certain times like church, at home when you are playing with them or when you are going to pull your hair out and need something for them to do. Anyway there are tons of ideas online if you google preschool activity kits or bags. Here is one to get you started. They are addicting and so fun. Dollar stores are a great place to get your supplies and or ideas. My kids LOVE these!
Also, so fun to make in groups. We met together and had one person make the same kit for everybody else and then trade a few days later. We ended up with great stuff for cheap!
And, if you aren't interested in the Preschool Kits... just think of the small piece toys you could organize with these 25 cent bags or anything else you could organize. Seriously I think they are the greatest and I am trying to think of more things to do with them while they are there because after school starts they will be so expensive and hard to find. Maybe I am weird but I love finds like these!
Sunday, August 9, 2009

Not much Sleeping Going on
How could I get mad when I walked into the boys room and saw this when they were supposed to be asleep? (in their own beds!) They were laughing so hard.
Saturday, August 8, 2009
New Vinyl Decals
A lot of people have been asking about vinyl decals. Here they are! VINYLTOUCHES.COM
(Oh yeah, if you use the code ILOVEVINYL at checkout you get free shipping on orders $20 and up.)


Monday, July 27, 2009
OLD NAVY AND GAP EXTRA 30% OFF COUPON THIS WEEKEND!
OLD NAVY AND GAP EXTRA 30% OFF COUPON
Thanks to my fabulous cousin's wife, Joanne for sharing this with me. The coolest part is that 5% of the amount you spend goes to The Leukemia & Lymphoma Society. (My Dad is an amazing survivor of Non-Hodgkins Lymphoma.)
Happy Shopping!
Saturday, July 18, 2009
Nice Townhouse For Sale

We are selling our Townhouse in Brigham City that we have been renting out for awhile.
Click Here for Details!
It is really cute with new paint, carpet and floorings. A great starter home!
Tuesday, June 16, 2009


Fam Reunion
My sister, Kelli and her husband threw the funnest Family Reunion last weekend. The highlight was the carnival with cotton candy, snowcones, doughnuts, games and face painting. The kids are still on a sugar high! Even through the rain, we had a blast!


Monday, June 15, 2009
Bear Lake 10K
I did it! I ran my first race with a little persuasion from Trevor, my sister, Julie, my Mother in law, and my friend, Tricia. We all ran it together last Saturday in Bear Lake. It was a chilly rainy day, but perfect weather for running. I pushed myself to keep up with Julie and Tricia and was 5th out of my age group. Trevor was 10th overall. I had a great time and might even do another one someday. 


Friday, May 8, 2009

Tuesday, May 5, 2009

The Blog Frog!

My sister just told me about BLOGFROG. This site gives you little widgets that tell you when your blog followers last posted, who last looked at your blog, who follows your blog, etc. And, it puts it on your blog for you--hassle free! Just thought you might want to know!
Wednesday, April 29, 2009
Oh Riley!

I love that Riley was walking around the block the other day in her huge sunglasses, talking on her cell phone, and pushing her stroller with her purse chuck full of lip gloss hanging on it. Hmmmm...where did she see that?
Thursday, April 16, 2009
How to Make Collages/Layouts using Picasa 3
Okay, this is how you make Collages using Picasa 3:
First download Picasa 3 (if you don't already have it)CLICK HERE..
Your Picture files should automatically be saved into Picasa 3. (if your Picasa 3 is acting weird, just Uninstall and Reinstall a new one--it's fast and won't lose your pics)
1-Click on a Picture
2-Edit the picture by cropping and changing Effects, fixing red eye, etc.
3-Click on the picture or pictures you want to make a collage or layout of. (Hint: if choosing more than one, hold down CTRL.) It will show you on the bottom left which pics you have chosen. Then click the COLLAGE link on the bottom of Picasa. This will put your pics into a collage. Note: you can only click on pics within one folder. If you want to mix pics from other folders you will have to click CLIPS and GET MORE after you are in the Collage Page.
4- Under Settings, click on which collage style you want. If you want to make it yourself, choose Picture Pile and size and arrange the pics yourself. If you want Picasa to do the work for you, click on Mosaic or Grid. It will automatically make a layout for you. You can click SHUFFLE below the collage to get different arrangments.
5- Adjust the Grid Spacing, for wider gaps between your pics.
6-Click on the dropper tool square for background colors, then click on a color out of the color grid, or color match by clicking on clothing articles in your pic to match. (That's my favorite)
8- VERY IMPORTANT: For the Page Format, click on the size of your collage and be consistent with all of them. I choose the SQUARE layout so when I make 12x12 photo books they are the right size. If you will be making 8x10 books, choose 8x10 on each one. Just don't forget this step!
7- You will not be able to add any Text yet, so if you want text, be sure to leave a spot for it before making your collage!
8- Once your pics are arranged how you like them and you have chosen your background color and chosen your Page Format click CREATE COLLAGE.
9- Once it is 100% complete, a new page will pull up. This is where you can add Text if you want. Click on the TEXT box and then click on your collage where you want your text to go, pick your font, and color and drag your text or resize until you like it. The color of the text is made by using the dropper tool again with the circle on the left. You can also put an outline around your text by using the Text Circle on the right.
10- Once you have your text complete, and any other basic fixes you want to make, your collage is complete. Click on FILE and SAVE to get it to save to your computer's picture file as well as to Picasa. Otherwise, it will be saved into a file Picasa makes called COLLAGES. See how easy! Watch out... it's addicting.
HOW TO MAKE A PHOTO BOOK WITH COLLAGES:
1- Now that you have your collage file, highlight all the collages you would like to make a Photo Book with.
2- Click on SHOP at the bottom of Picasa and click on which website you want to order from. The best deal I've found is Winkflash because they have an on again off again Flat Rate Book Sale where you can get up to 100 pages in one book starting at 19.95 for an 8x10 book. I love the 12 x 12 which is 29.95. Anyway, you can use whatever you want, but Winkflash has worked great for me. If you don't already have an account with that website, you will set one up right there.
3- Picasa will automatically start uploading all your highlighted Collages. You can do about 100 of them in a couple hours. (This is way way faster than uploading all your pics separately and then putting them in the book!)
4- Once they are uploaded, (it will tell you in the bottom right corner of Picasa, then you go to the website you are ordering from and find them. For winkflash, I go to Winkflash.com, click on Member Sign in, I sign in and then click on Books, I do the Classic Cover Book and then I click Window Cover Book (again, whatever you want to do here).
Type in your Book name and Book Size. (Notice, there is a glitch on winkflash where sometimes it changes your books size automatically throughout the process, just make sure in the end, that you double check that it is the book size you wanted. If not, it's easy to reclick your size again)
6- Click on Start Book and it will bring up your book layout. You've already made your collages so don't worry about all the different layouts. Choose the same full page square layout for every page. If it didn't pull up your collages, click on Open Folder and choose your collage foler. Then drag and drop your already made collages from your folder into the squares.
7- Do this up to 100 pages and then follow directions to check out. Don't forget to enter the discount code for the flat rate book sale at the end. (it tells you the code on their home page).
8- Note, shipping is $6 to $10 a book and I haven't seen any free shipping codes, but it's still worth it.
You're going to love your book. They are so much nicer than just dragging and dropping pics using their system. I hope this all makes sense. Good Luck! It's really easy once you get the hang of it! Wow, that's the longest post I've ever made.
Friday, April 10, 2009
PHOTO BOOKS
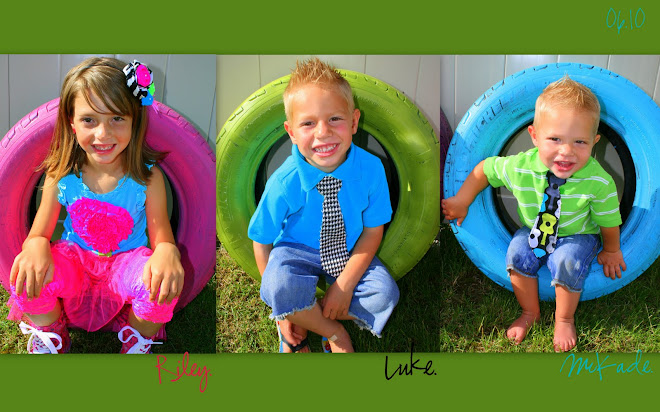
So this is how my photo books turned out. I did Riley's first. It is just a typical 8 x10 photo book using the Winkflash drag and drop method. It was okay, but then I made Luke's. For his I made square collages using Picasa 3 FIRST and then uploaded them to Winkflash and ordered their 12 x12 photo book. Since the pages were all made, I used the single image layout on every page and drug each collage to its page. His book turned out amazing and colorful. And I have to say, it was even easier to make than Riley's.
So, if you are looking for an easy way to print off your pics, I think this is totally the way to go. I've researched prices on many sites, and the biggest bang for your buck is Winkflash. They are doing their Flat Rate Book Sale again now where you get to have up to 100 pages for the base price. My 12 x 12 filled with 100 pages (and probably 400 + photos) was only $29.95. I do like Blurb, but they don't have a 12 x 12 book. And now that I have done one, there's no going back.
If you want me to post more details on making theses Picasa 3 collages, leave me a comment and I'll try to make a post all about it. It's my favorite discovery. I love that I'm no longer overwhelmed by pictures and what to do with them! 


Wednesday, April 1, 2009

Monday, March 23, 2009


Subscribe to:
Posts (Atom)